Browser devtools show you the DOM, not your source.
You spot the misaligned button, then go hunting through a component tree in your editor to work out which file renders it. The information you need was in the build output the whole time.
Your local development workspace
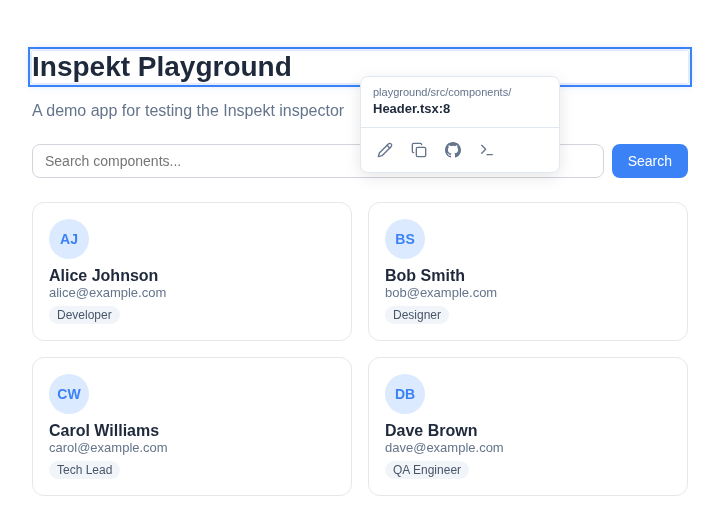
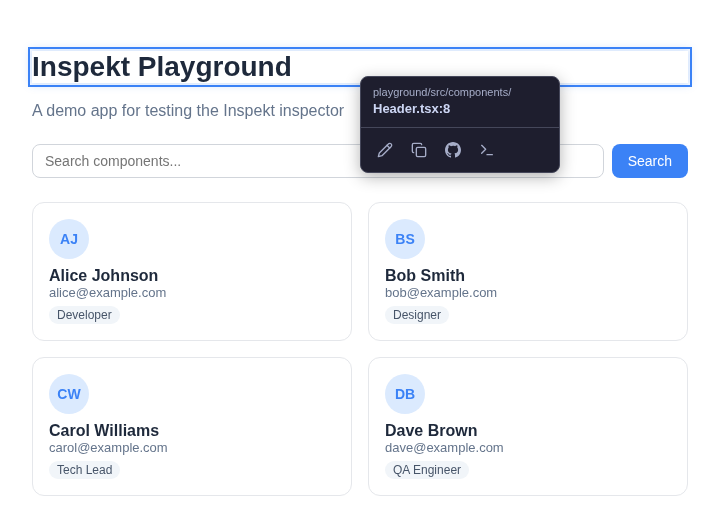
Add the Vite plugin to your development app. Then Ctrl+Alt+Click an instrumented element to see its source file and line. Expand the snippet, copy the path, or open the file in your configured editor.
MIT licensed. Inspect your local development page without creating an account or configuring an agent. Follow the install guide.
The friction
You spot the misaligned button, then go hunting through a component tree in your editor to work out which file renders it. The information you need was in the build output the whole time.
Framework devtools stop at the boundary of your editor, and the workflow resets every time you switch stacks.
"Fix this button" is useless without a file and a line, so you retype what the browser already knows. The context the agent needs is on screen and in the build output — it just has no path from one to the other.
What it does
Ctrl+Alt+Click an instrumented element in your local development app. The popover can name its source file, line, column, and component because the plugin annotated that element.
With the extension, daemon, and an MCP client configured separately, Send to Agent can queue a grab for your coding agent. The basic Vite inspector does not require this setup.
The inspector includes a component-tree panel and a source excerpt when the development server can resolve one. A DOM fallback may identify an element without a verified source location.
Keep your existing React/Vite project and add the inspector alongside its framework plugin.
The Vite plugin can read Docker Compose volume mounts or use an explicit path mapping to connect a container path to a host checkout.
The popover and tree render inside a Shadow DOM root. Highlights are applied to the selected element in your running development page.
How it works
The Vite plugin injects a data-insp-path attribute — file, line, column, component name — onto supported elements. This is development-only by default; production attributes require explicit opt-in.
Ctrl+Alt+Click walks up the DOM to the nearest annotated ancestor, highlights it, and opens the popover with its source location and actions.
The tree panel can show framework context where its adapter finds it; otherwise the inspector falls back to the annotated DOM.
Copy the path or open it in your configured editor. Agent handoff needs the optional extension, daemon, and MCP setup.
On Mac, Cmd replaces Ctrl.
The popover can ask your configured editor to open the selected file. The editor action depends on a working local editor command; use Copy path when it is unavailable.
The action registry also accepts custom actions through registerAction() to jump to a ticket, a dashboard, or anywhere else that element should lead.
The packages
@aylith/inspekt Everything in one, plus the inspekt, inspekt-daemon, and inspekt-mcp commands@aylith/inspekt-core Runtime UI — overlay, popover, tree panel, highlighting@aylith/inspekt-vite Vite plugin — injects source locations at build time@aylith/inspekt-bundlers Webpack, Rspack, esbuild, and Rollup plugins via unplugin@aylith/inspekt-cli Opens files in your IDE from the terminal@aylith/inspekt-daemon Localhost HTTP server holding the grab queue@aylith/inspekt-mcp MCP server exposing that queue to agents over stdio@aylith/inspekt-skill Installable skill telling a skill-aware agent when to read a grabThe Vite download includes the inspector runtime, local editor CLI and plugin. It works without the optional Chrome extension, daemon or MCP integration.
Get started
npm install -D ./aylith-inspekt-core-0.4.1.tgz ./aylith-inspekt-cli-0.1.2.tgz ./aylith-inspekt-vite-0.2.3.tgz
// vite.config.ts
import { defineConfig } from 'vite';
import { inspekt } from '@aylith/inspekt-vite';

export default defineConfig({
  plugins: [inspekt({ editor: 'cursor' })],
});
Keep your existing framework plugin. The basic Vite route needs Inspekt's plugin to inject the runtime. Download the package bundle, extract it into your project, verify its checksums, and install all three archives together. npm downloads their external dependencies.
The optional agent bundle adds the local daemon and MCP server. It registers your installed agent with the shared grab queue. Browser capture has its own installation.
Download the five-package agent bundle Agent setup guideStart your existing development script and open its URL. Ctrl+Alt+Click an instrumented element to see its file and line. Expand Show source, then Copy path. Press Escape to return to ordinary page clicks.
The bundle also includes the local editor CLI. Opening a file requires your configured editor installed on the machine. Agent handoff uses separate daemon and MCP setup.